In the world of cosmetic dentistry and fashion, tooth gems have become one of the most talked-about trends. These tiny crystals, diamonds, or metallic designs can turn an ordinary smile into something sparkling and unique. Whether seen on celebrities, influencers, or everyday fashion enthusiasts, tooth gems are now a popular form of self-expression.
But when it comes to getting a tooth gem, there are two main options: having it applied by a professional dentist or using a DIY tooth gem kit purchased online. While both approaches promise the same result—a sparkling smile—the reality is very different.
This article will compare professional procedures and DIY kits, highlighting the benefits, risks, costs, and long-term outcomes of each.
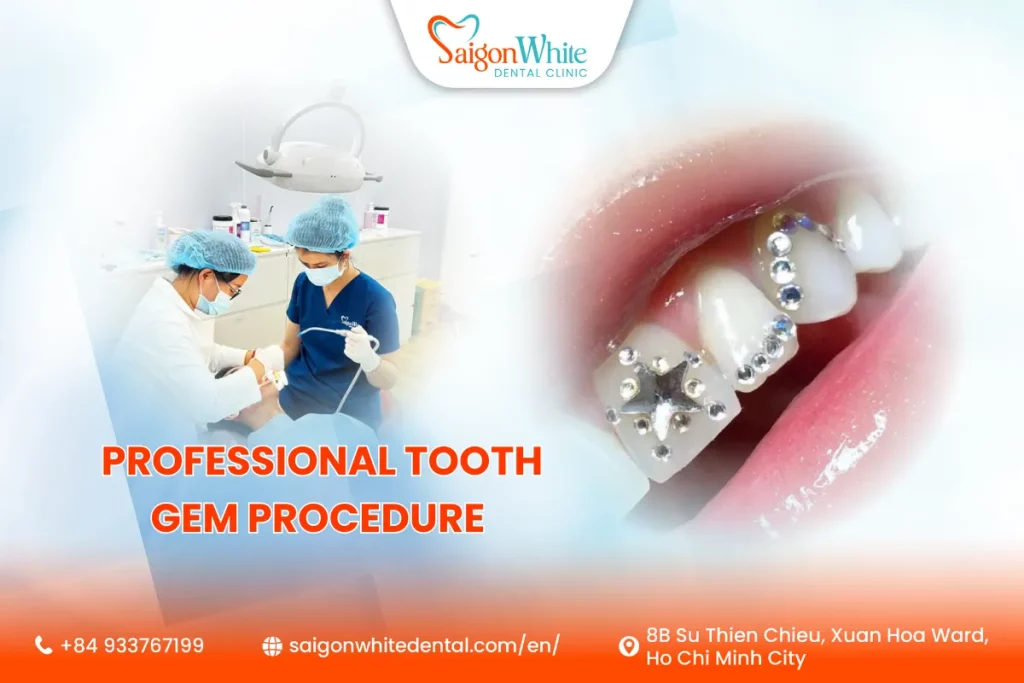
Professional Tooth Gem Procedure
Step-by-Step Process
- Dental consultation: The dentist examines your teeth and gums to ensure they are healthy.
- Tooth cleaning: The chosen tooth is polished to remove plaque or stains.
- Isolation: The tooth is kept dry with cotton rolls or cheek retractors.
- Etching: A mild acid gel is applied to create a textured surface.
- Bonding agent: A dental-grade adhesive is used.
- Gem placement: The jewel is positioned with precision tools.
- Light curing: A blue UV light hardens the adhesive.
- Final check: The dentist ensures the gem is stable and comfortable.
Benefits of Professional Application
- Precision: Dentists can place the gem exactly where you want it.
- Durability: Professional gems can last 6 months to 2 years.
- Safety: Only dental-grade adhesives are used.
- Comfort: Final polishing ensures no irritation to lips or tongue.
- Reversible: Gems can be removed safely without harming enamel.
Cost and Value
- Professional tooth gems usually cost $100–$500, depending on the material.
- While the price is higher than DIY kits, the quality and safety justify the expense.
DIY Tooth Gem Kits
What They Include
DIY kits, available online for as little as $20–$50, typically contain:
- Small crystals or rhinestones.
- An adhesive (often nail glue or craft glue).
- Applicators and instructions.
How They Are Marketed
- Advertised as a cheap and easy alternative.
- Popular with teenagers and young adults.
- Promoted on platforms like TikTok, Instagram, and beauty blogs.
Risks of DIY Kits
- Unsafe adhesives: Many contain chemicals not meant for teeth.
- Enamel damage: Nail glue can erode enamel and cause permanent damage.
- Poor hygiene: Lack of sterilization increases the risk of infection.
- Short lifespan: Gems often fall off within days or weeks.
- Uneven placement: Without precision tools, gems may look crooked.
Key Differences Between Professional and DIY
| Feature | Professional Procedure | DIY Kits |
|---|---|---|
| Safety | Uses dental-grade adhesives | Uses unsafe glues (nail/craft glue) |
| Durability | 6 months to 2 years | A few days to weeks |
| Appearance | Precise, polished placement | Crooked or uneven |
| Comfort | Smooth finish, no irritation | Risk of rough edges or discomfort |
| Cost | $100–$500+ | $20–$50 |
| Risk Level | Very low when done by a dentist | High risk of enamel and gum damage |
Risks of DIY Tooth Gem Kits
- Enamel Erosion
Non-dental adhesives contain harsh chemicals that can erode enamel, leading to permanent sensitivity or cavities. - Plaque and Bacteria
Improperly bonded gems create spaces where food and bacteria can accumulate, increasing the risk of decay. - Gum Irritation and Infections
Glue that seeps onto gums can cause burns, irritation, or infections. - Choking Hazard
Since DIY gems fall off more easily, there is a risk of swallowing or inhaling them. - Costly Dental Repairs
What seems like a $20 kit may end up costing hundreds of dollars in dental treatment if damage occurs.
Benefits of Professional Application
- Safety
Dentists use adhesives that are tested, safe, and reversible. - Durability
Professional gems last much longer and are resistant to everyday wear. - Custom Designs
You can choose high-quality gems like diamonds or gold for a more luxurious look. - Reversibility
If you want to remove the gem, the dentist can polish it off safely. - Confidence
A professionally applied gem looks better, feels comfortable, and won’t embarrass you by falling out suddenly.
Cost Comparison
- Professional Procedure: $100–$500+
- DIY Kit: $20–$50
At first glance, DIY seems cheaper. But factoring in longevity, safety, and potential repair costs, professional application is actually more cost-effective in the long run.
Example:
- A $40 DIY kit lasts 2 weeks, meaning you may need multiple kits per year ($200+).
- A $200 professional gel lasts up to 1–2 years, without the risk of dental damage.
Which Option Should You Choose?
- Choose Professional Procedure if:
- You care about oral health and safety.
- You want the gem to last months or years.
- You value precision, comfort, and aesthetics.
- Choose DIY Kit if:
- You only want a very short-term sparkle (a party or photo shoot).
- You accept the risk of enamel damage and infections.
- You are experimenting and don’t mind uneven results.
=> Overall, a professional application is the clear winner for anyone who values their smile and oral health.
FAQs
1. Are DIY kits ever safe?
Not really. Even if the gems stick, the adhesives can harm enamel and gums.
2. How long do professional tooth gems last?
Anywhere from 6 months to 2 years, depending on material and care.
3. Can DIY kits damage enamel permanently?
Yes. Non-dental adhesives can erode enamel and cause lasting sensitivity.
4. Can I remove a tooth gem at home?
It is not recommended. Only a dentist should remove it safely.